BAKFlip Installation Guide | Step-by-Step Instructions
Installing a BAKFlip tonneau cover takes 25-35 minutes with basic hand tools. No drilling required on most truck models—just position the rails, tighten the clamps, and you’re done.
This guide covers everything you need to know for a perfect installation, from unboxing your new cover to final adjustments. Whether you’re installing a MX4, G2, or F1, the process is nearly identical across all BAKFlip models.
First-time installers should budget 45 minutes. Experienced truck owners who’ve done this before can knock it out in 20 minutes. Either way, you’ll have professional results without paying shop labor rates.
What’s Included in the Box
Every BAKFlip cover comes complete with everything needed for installation. Here’s what you’ll find when you open the package.
Tonneau Cover Assembly
The main cover with all four panels pre-assembled and hinged together. The cover arrives folded for easier handling and storage.
Side Rails (2)
Left and right bed rails with pre-installed mounting clamps. These provide the foundation for the entire cover system.
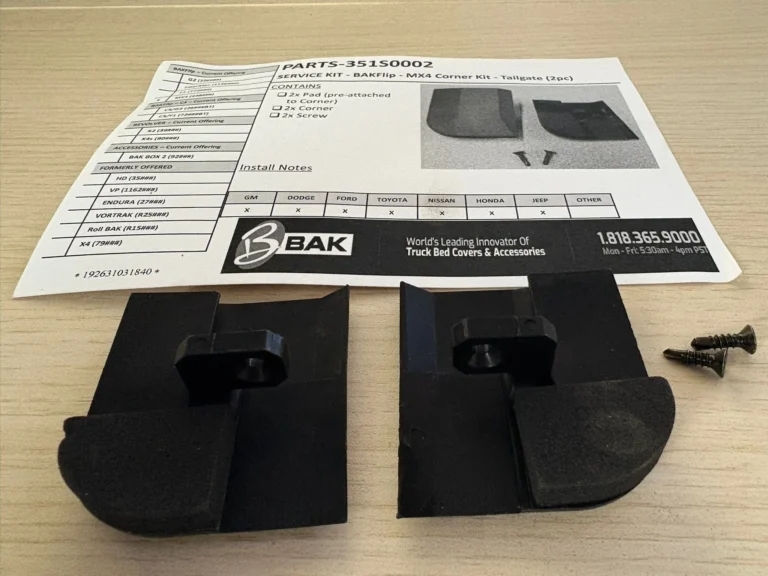
Hardware Kit
All bolts, clamps, spacers, and fasteners needed for installation. Everything is organized and labeled for easy identification.
Rubber Seals
EPDM weather seals for all edges and the tailgate. These create the watertight barrier that keeps your cargo dry.
Prop Rod Assembly
Spring-loaded support rods that hold the cover open against your cab. These install quickly and operate automatically.
Installation Instructions
Detailed manual with photos specific to your truck model. QR codes link to video tutorials for visual learners.
Before You Start
Verify you received the correct model for your truck’s year, make, and bed length. The part number on the box should match your order confirmation.
Inspect all panels for shipping damage before installation. BAK Industries will replace damaged components, but it’s much easier to catch issues before mounting the cover.
Read through the complete instructions once before starting. Understanding the full process prevents mistakes that waste time.
Tools Required
You probably have everything you need in your garage already. Here’s the complete tool list for BAKFlip installation.
Socket Wrench Set
You’ll need 10mm, 13mm, and 15mm sockets for the mounting clamps. A ratchet with 6-inch extension makes tight spaces easier.
Phillips Screwdriver
Used for prop rod installation and minor adjustments. A standard #2 Phillips works fine—no need for power tools.
Tape Measure
For centering the rails and ensuring equal overhang on both sides. Precision here prevents alignment issues later.
Cleaning Supplies
Rubbing alcohol or automotive cleaner plus shop towels. Clean mounting surfaces ensure proper seal compression and prevent slipping.
Helper (Optional)
One person can do this job alone, but a helper makes positioning the cover much easier. Most useful during the initial rail placement.
Work Gloves
The aluminum panels have sharp edges. Gloves prevent cuts and give better grip when handling the folded cover assembly.
That’s it—no power drill, no specialty tools, no permanent modifications to your truck. The whole installation uses hand tools you already own.
Step-by-Step Installation Process
Follow these steps in order for the best results. Don’t skip ahead or try to rush through—taking your time on the initial setup prevents problems later.
Prepare Your Truck Bed
Remove any existing bed liner, tonneau cover, or accessories. The bed rails need to be completely clean and clear.
Clean the bed rail tops thoroughly with rubbing alcohol to remove wax, dirt, and oils. Let them dry completely before proceeding.
Check for any damage to the bed rails. Dents or bends can affect clamp positioning and seal compression.
Position the Side Rails
Place both side rails on your bed rails without tightening anything yet. The rails should sit flush against the inside edge of your bed rails.
Measure from the bulkhead to ensure both rails are positioned identically. They should be exactly parallel with equal distance from the cab.
The front of the rail assembly should align with the marks indicated in your instructions—typically 1-2 inches from the bulkhead.
Install Mounting Clamps
Hand-tighten the clamps at each mounting point along both rails. Don’t fully tighten yet—just snug enough to hold position.
The clamps should grip firmly without crushing. Overtightening can crack bed rail caps or warp the mounting rails.
For spray-in bed liners, use the included spacer shims between clamps and rails to account for liner thickness.
Install Drain Tubes
Push the rubber drain tubes through the pre-drilled holes in your bed rails. These tubes channel water out of the cover’s drain system.
The tubes should hang down below the frame rail so water drips clear of your truck. Trim excess length if they’re too long.
Make sure drain tubes aren’t kinked or pinched—water needs a clear path out or it will back up into your bed.
Place the Cover Assembly
With a helper, carefully lift the folded cover assembly and set it onto the installed rails. The cover should click into the rail channels.
Center the cover so there’s equal overhang on both sides. A slight gap (1/8 inch) between panels and bed rails is normal and necessary.
Push down firmly on all four corners to ensure the cover is fully seated in the mounting rails.
Install Tailgate Seal
Attach the tailgate seal to the rear panel of your cover. Clean the mounting surface first with rubbing alcohol.
Press firmly along the entire length to activate the adhesive. The seal should extend down the tailgate to block water entry.
Close your tailgate and check seal compression. You should see even contact all the way across—adjust position if needed before adhesive sets.
Attach Prop Rods
Install the spring-loaded prop rods to the front panel corners. These rods support the cover when folded open against your cab.
Test the prop rod operation by folding the cover forward. The rods should extend automatically and lock in place with a solid click.
Fold the cover back closed and verify the prop rods retract smoothly without catching or binding.
Final Adjustments
Close the cover completely and check seal compression all around. The seals should contact evenly with no gaps visible.
Test the automatic latches by opening and closing each panel. They should engage smoothly and lock securely without forcing.
Once everything operates correctly, do a final tightening pass on all mounting clamps. Work from front to back using a torque pattern.
Operation Check
Raise and lower your tailgate several times to verify clearance. The cover should not contact the tailgate at any point during operation.
Fold the cover open in sections to test panel operation. All hinges should move smoothly without binding or creaking.
Test the latch release by pulling the handle with the tailgate closed. The first panel should release easily for access.
BAKFlip Installation Video Tutorial
Complete installation walkthrough with visual step-by-step instructions
Installation Tips and Tricks
These pro tips from experienced installers will save you time and prevent common mistakes.
Temperature Matters
Install your BAKFlip when it’s 50-80°F if possible. Cold weather makes rubber seals stiff and hard to position. Hot weather makes adhesive set too quickly.
Don’t Overtighten
Hand-tight plus a quarter turn is enough for mounting clamps. Cranking down too hard can crack plastic bed rail caps or strip threads.
Mark Your Position
Use masking tape to mark rail positions before final tightening. This lets you remove and reposition without losing alignment if needed.
Clean Twice
Wipe bed rails with rubbing alcohol, let dry, then wipe again. Any oil or silicone residue will cause seals to slip and clamps to work loose over time.
Test Before Final Tightening
With clamps just snug, test all operations before doing the final tightening pass. It’s much easier to adjust position now than after everything is locked down.
Save the Instructions
Keep your installation manual and warranty card in your glove box. You’ll need the serial number for warranty claims and the instructions for future adjustments.
Truck-Specific Installation Notes
Most BAKFlip installations are similar, but some truck models have unique requirements or considerations.
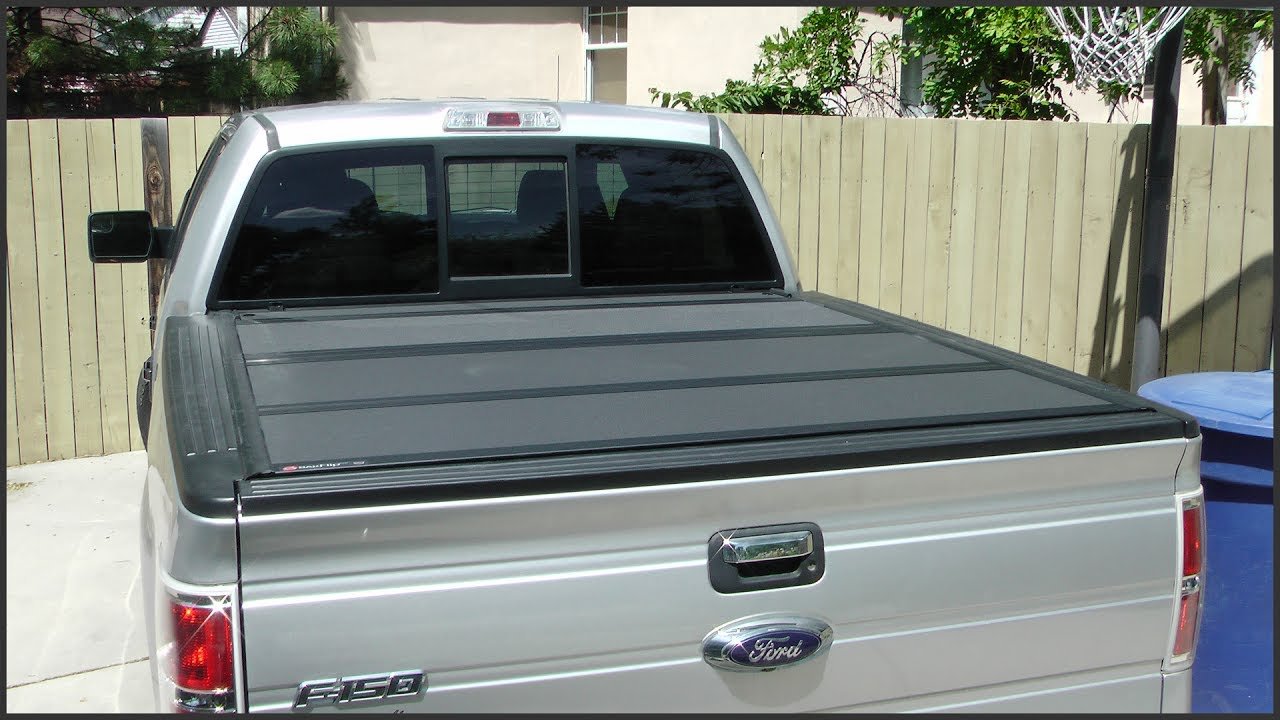
Ford F-150 and F-250
Ford trucks with the tailgate step require special attention to the tailgate seal positioning. Make sure the seal doesn’t interfere with step operation.
F-150 models with the BoxLink system may need spacers at certain clamp positions. Check your instruction sheet for BoxLink-specific notes.
The factory bed tie-downs don’t interfere with BAKFlip installation—you’ll retain full functionality of all tie-down points.
Ram 1500, 2500, 3500
Ram trucks with the RamBox bed storage system require specific BAKFlip models designed for reduced bed width. Standard covers won’t fit RamBox-equipped trucks.
The multifunction tailgate on newer Rams works perfectly with BAKFlip covers. All tailgate positions (split, barn door, drop-down) remain fully functional.
Ram’s factory cargo rails and tie-downs integrate cleanly with BAKFlip mounting—no interference or modifications needed.
Chevy Silverado and GMC Sierra
Silverado and Sierra trucks with the CarbonPro bed need standard installation—the carbon fiber bed acts just like steel for mounting purposes.
The factory bed rail system on newer models may require removing the center channel before BAKFlip installation. Your instructions include model-specific guidance.
MultiPro tailgates work great with BAKFlip covers. The inner gate and step function normally with the cover installed.
Toyota Tacoma and Tundra
Tacoma short beds (5-foot) need careful measurement during rail positioning. The tight space requires precision to maintain proper panel alignment.
Tundra models with the factory deck rail system should leave the rails installed—BAKFlip clamps work around them without removal.
The composite bed on newer Tundras uses the same installation process as steel beds. No special procedures or hardware needed.
Nissan Titan and Frontier
Nissan’s Utili-track bed channel system doesn’t interfere with BAKFlip installation. The mounting clamps position between the track sections.
Titan XD models use the same cover as standard Titan—just verify you ordered the correct bed length for your specific truck.
Working with Spray-In Bed Liners
BAKFlip covers install perfectly over spray-in bed liners, but the process requires a few extra considerations.
Pre-Installation Planning
If you’re getting a spray-in liner and BAKFlip cover, tell your liner installer about the tonneau cover. They can mask off the bed rail tops to prevent overspray.
Alternatively, they can spray lighter coats on the rail tops so clamps grip properly. Heavy liner buildup under clamps can cause loosening over time.
Using Spacer Shims
BAKFlip includes spacer shims to account for bed liner thickness under the mounting rails. These maintain proper rail height relative to the bed.
Install shims between the rail and bed rail where the liner creates thickness. Typical spray liners need 1/8-inch shims, while thick coatings may need 1/4-inch.
Test fit before final installation—rails should sit level with minimal gap under the panels when spacers are properly sized.
Clamp Tightening
Spray-in liners can compress slightly under clamp pressure. Hand-tighten the clamps, wait 24 hours, then re-check and snug up if needed.
Don’t overtighten trying to eliminate normal compression. The liner material will settle after a few days of use.
Drain Tube Installation
Drill through the liner for drain tubes if your bed didn’t have existing holes. Use the rail’s pre-drilled holes as guides for perfect positioning.
Spray-in liners won’t affect drain tube function—water flows through normally once tubes are properly installed through the liner.
Common Installation Problems and Solutions
Here’s how to fix the most frequent issues that come up during BAKFlip installation.
Panels Don’t Sit Flush
Problem: Cover panels stick up higher than bed rails or angle wrong when closed.
Solution: Check rail positioning and clamp tightness. Uneven clamp tension causes rails to sit at different heights. Measure rail height at multiple points to identify the problem area, then adjust clamps until both rails are perfectly level.
Latches Won’t Engage
Problem: Automatic latches don’t catch when you close panels or release too easily.
Solution: The latch mechanism needs slight adjustment. Loosen the latch mounting screws, reposition for better engagement, then retighten. Test operation before final tightening to confirm proper catch and release.
Water Leaks at Panels
Problem: Water gets through panel seams during heavy rain or car washes.
Solution: Check seal compression all around. If seals aren’t making full contact, adjust rail position slightly inward. Also verify drain tubes aren’t clogged—backed up water can overflow into the bed.
Tailgate Seal Doesn’t Touch
Problem: Gap visible between tailgate seal and tailgate when closed.
Solution: The seal may need repositioning or the cover rails might be too far forward. Move rails slightly rearward (1/4 inch typically), re-test seal contact, and adjust until seal compression is even across the full width.
Cover Difficult to Fold
Problem: Panels bind or require excessive force to fold open.
Solution: Rails may be too tight against bed rails, pinching the cover. Loosen clamps slightly—you need a small gap (1/8 inch) between panels and bed rails for smooth operation. Also lubricate hinges with silicone spray.
Prop Rods Won’t Lock
Problem: Prop rods don’t extend fully or won’t stay locked when cover is folded.
Solution: Check for proper prop rod installation and spring tension. The rods should snap into place with a distinct click. If tension seems weak, the spring may need adjustment or replacement.
When to Contact Support
If you can’t resolve installation issues after trying these solutions, contact BAK Industries support before forcing anything. Their technical team can walk you through truck-specific solutions.
Don’t drill, cut, or permanently modify your cover trying to make it fit. Most installation problems result from simple positioning or adjustment issues that support can help diagnose.
Keep your purchase receipt and serial number handy when calling—support will need this information to access your specific cover specifications.
Post-Installation Break-In Period
Your new BAKFlip cover will perform best after a brief break-in period. Here’s what to expect during the first few weeks.
Initial Adjustments
Check clamp tightness after the first week of use. Temperature changes and normal settling may require minor re-tightening.
The latches might feel slightly stiff initially. This is normal—the mechanisms will smooth out after 10-20 open/close cycles.
Rubber seals need time to compress and conform to your bed’s unique contours. Water sealing improves after a few weeks as seals seat properly.
First Car Wash
Avoid high-pressure washes for the first two weeks if possible. Give adhesive seals time to cure fully before subjecting them to intense water pressure.
After the break-in period, your BAKFlip handles pressure washers fine. Just don’t aim the wand directly at panel seams at close range.
Weather Exposure
The first rainfall will show you how well your cover seals. A few drops through panel seams is normal—any hard folding cover has minor water entry during extreme weather.
If you see significant water intrusion, check seal compression and drain tube function. Make adjustments early rather than waiting for seals to set permanently.
Temperature Cycling
Panels may make minor creaking sounds as temperatures fluctuate during the first month. This is normal thermal expansion/contraction as materials stabilize.
Hinges might feel slightly different in extreme cold until the cover gets through a complete season cycle. Operating characteristics normalize after exposure to your local climate.
Removal and Reinstallation
Need to remove your BAKFlip temporarily for hauling tall cargo or cleaning? The process takes about 5 minutes.
Quick Removal
Open your tailgate and fold the cover completely forward against the cab. Disconnect the prop rods from their mounting points.
Loosen the clamps just enough to release tension—you don’t need to remove clamps completely. The cover lifts straight up and out of the rail channels.
With a helper, lift the folded cover assembly off your truck. Store it in a clean area where the panels won’t get scratched or dirty.
Reinstallation
Position the folded cover over the bed rails and lower it into the mounting channels. Press down firmly at all four corners to seat completely.
Retighten the clamps in the same sequence as original installation. Reconnect prop rods and test all operations before driving.
Check seal compression and latch function after reinstalling. Make minor adjustments if needed to restore original fit and operation.
Storage Tips
Store removed BAKFlip covers indoors if possible. The panels are tough but shouldn’t sit outside uncovered for extended periods.
Keep the cover folded during storage to maintain hinge integrity. Laying panels flat for months can stress hinges and seals.
Cover the assembly with a furniture blanket or tarp to prevent dust accumulation. Clean panels thoroughly before reinstalling to prevent scratching during the mounting process.
Maintenance After Installation
Proper maintenance keeps your BAKFlip operating smoothly for 10+ years. Here’s what you need to do and how often.
Monthly Checks
Open and close the cover fully to check hinge operation. Smooth motion indicates everything is working correctly.
Inspect rubber seals for damage, tearing, or separation. Catching seal problems early prevents water intrusion and more expensive repairs.
Test latch engagement on all panels. Latches should catch firmly and release cleanly without sticking or requiring excessive force.
Every 3 Months
Wash the cover with regular car soap and water. The aluminum finish doesn’t need waxing, but cleaning removes corrosive dirt and road salt.
Apply silicone spray to all rubber seals. This keeps them flexible and prevents cracking from UV exposure and temperature cycles.
Check drain tubes for clogs. Clear any debris that might block water flow and cause backup into your bed.
Every 6 Months
Verify all mounting clamps remain tight. Temperature cycling and vibration can loosen clamps gradually—re-tighten before they become loose enough to cause problems.
Lubricate hinges and latches with dry lubricant spray. Don’t use oil-based products that attract dirt and gum up mechanisms.
Inspect the tailgate seal for compression and adhesion. Replace if it’s separating or no longer making full contact with the tailgate.
Annual Maintenance
Do a complete inspection of all components. Look for any signs of wear, damage, or developing problems.
Consider replacing rubber seals if your truck is in harsh climate conditions. Seals typically last 5-7 years but may need earlier replacement in extreme environments.
Check prop rod spring tension and operation. Weak springs should be replaced before they fail completely.
For complete maintenance guidance and replacement parts, visit our parts section.
Warranty Registration
Register your BAKFlip cover immediately after installation to activate warranty protection and simplify future claims.
What the Warranty Covers
MX4 and F1 models include 5-year limited warranties. The G2 comes with 3-year coverage.
Warranties cover defects in materials and workmanship including panel failures, hardware defects, and seal deterioration from normal use.
Coverage doesn’t include damage from accidents, improper installation, or normal wear items. Read your warranty card for complete terms.
How to Register
Visit the BAK Industries website and locate the warranty registration page. You’ll need your cover’s serial number from the documentation packet.
Enter your contact information, truck details, and purchase date. Keep your proof of purchase—you’ll need it for any warranty claims.
Save your registration confirmation email. This proves you completed registration within the required timeframe.
Need More Help?
This installation guide covers the complete process for all BAKFlip models. For model-specific details, check our individual product pages for the MX4, G2, and F1.
Still have questions about installation or need technical support? Visit our homepage for contact information and additional resources.
Looking for accessories to enhance your BAKFlip cover? Browse our parts and accessories section for upgrades, replacements, and additions.
Similar Posts
BAKFlip Reviews | 2,800+ Real Owner Experiences & Ratings
BAKFlip Tonneau Cover Reviews | Real Owner Experiences Thinking about buying a BAKFlip truck bed cover? Here’s what actual owners say after months of daily use—the good, the bad, and everything in between. We’ve compiled real reviews from verified buyers who’ve installed BAKFlip covers on their Ford, Chevy, Ram, and Toyota trucks. No marketing fluff,…
BAKFlip Parts & Accessories | Replacement Seals, Latches & Repairs
BAKFlip Parts & Accessories | Replacement Components & Upgrades Your BAKFlip tonneau cover is built to last decades, but even the toughest truck bed covers need replacement parts eventually. Seals wear out from years of UV exposure. Latches can break if you force them closed with debris in the way. Prop rod springs lose tension…