BAKFlip MX4 Installation Guide | Complete Step-by-Step Instructions
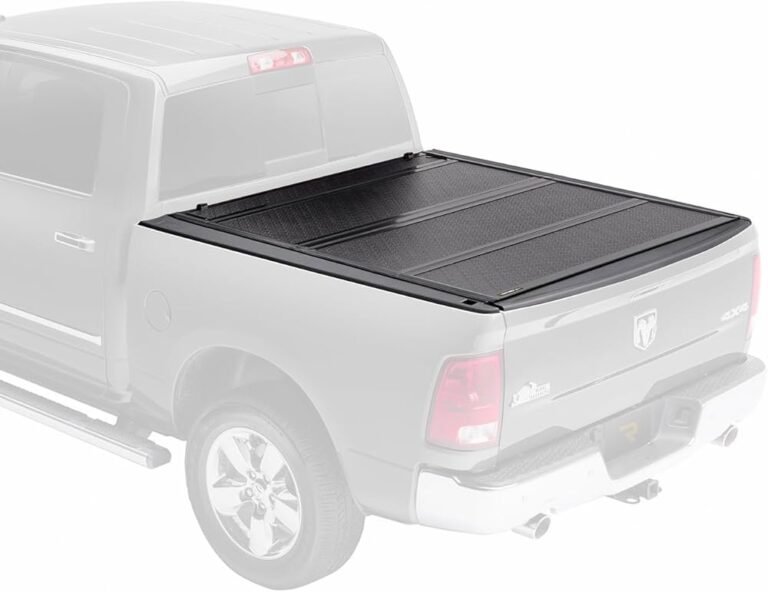
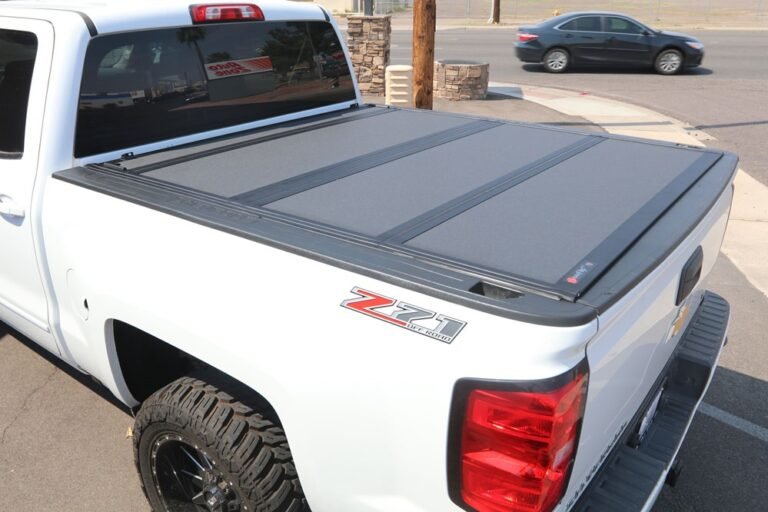
BAKFlip MX4 Hard Folding Tonneau Cover
The BAKFlip MX4 installation process begins with this premium aluminum tonneau cover featuring four-panel folding design and no-drill clamp installation. Engineered with precise tolerances for professional results, the MX4 fits F-150, Silverado, RAM 1500, Tundra, and dozens of other truck models. Installation typically takes 60-90 minutes with basic hand tools. Includes comprehensive installation manual with step-by-step photos and torque specifications. All necessary hardware and clamps included for complete bakflip mx4 installation without modifications to your truck bed.
Pre-Installation Preparation for BAKFlip MX4
Successful bakflip mx4 installation starts with proper preparation before removing any components from the packaging. Clear your truck bed completely, removing cargo, bed mats, and any aftermarket accessories that might interfere with rail placement. The MX4’s no-drill clamp system requires access to clean bed rail surfaces for secure mounting.
Inspect your truck bed for damage, rust, or modifications that could affect installation. Small dents usually don’t interfere, but bent bed rails or significant damage may require professional assessment. Check that your tailgate opens and closes smoothly—binding tailgates can damage the cover during installation or operation.
Verify you received all components by comparing box contents against the bakflip mx4 installation manual parts list. Missing hardware or damaged components should be reported to your dealer immediately. BAK Industries includes extra clips and small fasteners, but major components like rails and panels require replacement if damaged during shipping.
Essential Tools for Installation
Gather all necessary tools before beginning your bakflip mx4 install to avoid delays during critical assembly steps. You’ll need a socket wrench set with both metric and SAE sockets, typically 10mm, 13mm, and 7/16-inch sizes for the clamps and hardware. A torque wrench ensures proper clamp tightening without over-torquing that can crack bed rails.
Include flathead and Phillips screwdrivers for prying and adjustments, plus a rubber mallet for seating components without damage. Measuring tape helps verify rail positioning and panel alignment. Keep masking tape handy for marking clamp positions before final tightening. Clean rags and isopropyl alcohol clean surfaces for optimal seal adhesion.
Consider having an assistant available for panel positioning and alignment checks. While one person can complete the installation alone, having help makes the process faster and reduces the risk of dropping or misaligning heavy components during critical steps.
Workspace Setup and Safety
Position your truck on level ground in a covered area if possible. Direct sunlight makes metal components hot to handle and can affect adhesive performance during real truck bakflip mx4 installation. Adequate lighting helps you see alignment marks and hardware clearly during assembly.
Protect your truck’s paint by laying cardboard or moving blankets around the work area. Hardware and tools dropped during installation can chip paint or dent surfaces. Keep dropped fasteners from rolling away by working over tarps or drop cloths.
Wear safety glasses when using compressed air or working underneath raised panels. Work gloves protect hands from sharp aluminum edges but ensure they don’t interfere with precise adjustments or torque wrench operation.
Step-by-Step BAKFlip MX4 Installation Instructions
The bakflip mx4 installation instructions follow a logical sequence that ensures proper fit and operation. Start with rail installation since everything else mounts to this foundation. Take your time with measurements and alignment—rushing leads to problems that require disassembly and rework.
Installing the Side Rails
Begin by positioning the driver-side rail along your truck bed’s rail. The BAKFlip MX4 uses no-drill clamp installation that secures to existing bed rail structure without permanent modifications. Slide the rail assembly into position, ensuring it sits flush against the bed rail with no gaps or high spots.
Locate the clamp positions according to your truck-specific template included in the installation kit. Most trucks use 4-6 clamps per side, positioned to distribute load evenly across the bed rail structure. Mark clamp locations with masking tape before installing any hardware.
Install clamps finger-tight initially, allowing adjustment for final alignment. The bakflip mx4 installation manual specifies torque values for each truck model—typically 15-25 ft-lbs depending on bed rail construction. Over-tightening cracks aluminum rails while under-tightening allows movement and leaks.
Repeat the process for the passenger-side rail, ensuring both rails are parallel and properly positioned. Measure from the bulkhead to verify equal positioning—rails off by more than 1/8 inch cause binding and premature wear. Use the measurement charts in your installation guide for truck-specific positioning requirements.
Panel Assembly and Hinge Alignment
With rails securely mounted, begin panel assembly starting from the tailgate forward. The MX4’s four-panel design requires precise hinge alignment for smooth folding operation. Each panel connects with heavy-duty aluminum hinges that must align perfectly to prevent binding.
Position the tailgate panel first, aligning it with the rail-mounted brackets. The panel should sit flush with rail tops and extend slightly over the tailgate when closed. Verify that tailgate opening doesn’t contact the panel—clearance issues require adjustment before proceeding.
Attach subsequent panels working toward the cab, checking hinge alignment at each step. Panels should fold smoothly without forcing or binding. Misaligned hinges cause premature wear and can crack panels under stress. The bakflip mx4 installation instructions include alignment procedures specific to your truck model.
Test fold operation after each panel installation to catch alignment problems early. Panels should fold completely flat against each other with minimal effort. Resistance indicates alignment issues requiring correction before final assembly.
Seal Installation and Weather Sealing
Install the perimeter sealing system that makes your MX4 weatherproof. The EPDM rubber seals attach to rail tops and panel edges, creating compression barriers against rain, snow, and dust intrusion. Clean all sealing surfaces with isopropyl alcohol before installation for maximum adhesion.
Start with the side rail seals, peeling backing paper and pressing firmly into the rail channels. Work out air bubbles and ensure complete contact along the entire length. Corner areas require careful fitting to maintain continuous sealing without gaps.
Install panel edge seals next, following the same cleaning and pressing procedure. These seals compress when panels close, creating the weather barrier that keeps cargo dry. Damaged or poorly installed seals compromise the entire weather sealing system.
Latch Mechanism Setup
The MX4’s automatic latching system secures panels without manual locking. Install latch mechanisms according to truck-specific positioning guides, ensuring proper alignment with panel edges. Latches must engage smoothly when panels close but hold securely against wind and driving forces.
Adjust latch tension using the provided tools and procedures in your bakflip mx4 installation manual. Too loose allows panels to pop open while driving. Too tight makes closing difficult and accelerates wear on latch components. Test operation repeatedly during adjustment to find the optimal setting.
Verify that all latches engage simultaneously when closing the cover. One latch engaging before others causes uneven stress and potential damage. The adjustment process requires patience but ensures years of reliable operation.
Truck-Specific Installation Considerations
Different truck models require specific modifications to the standard bakflip mx4 installation procedure. Understanding these variations prevents installation errors and ensures optimal fit and function. BAK Industries provides truck-specific guides covering the most common applications.
Ford F-150 Installation Notes
F-150 models from 2015-present feature aluminum bed construction requiring modified clamp torque specifications. The softer aluminum bed rails need reduced torque—typically 15-18 ft-lbs versus 20-25 ft-lbs for steel beds. Over-torquing aluminum beds creates permanent indentations that compromise clamp security.
F-150s with factory spray-in bedliners may need liner trimming where clamps contact bed rails. Most spray-in liners are thin enough to clamp through, but thick applications require careful trimming for proper clamp seating. Use a sharp utility knife and work slowly to avoid cutting too much material.
The F-150’s tailgate design requires specific panel positioning to ensure proper clearance during opening. Measure carefully and follow F-150-specific positioning guides to prevent interference that could damage the tailgate or cover.
Chevrolet Silverado and GMC Sierra Considerations
Silverado and Sierra trucks feature steel bed construction that handles standard torque specifications without damage. However, the bed rail design includes stake pocket cutouts that affect clamp positioning. Some clamps must position between stake pockets for proper alignment.
Multi-flex tailgate models require special attention to panel clearance during both standard opening and multi-flex operation. Test all tailgate positions after installation to verify adequate clearance. The cover should not contact any tailgate position during normal operation.
Silverado models with factory bed steps need modified clamp positioning to avoid interference with step mechanisms. Check your truck-specific guide for clamp location modifications required for bed step compatibility.
RAM 1500 Installation Specifics
RAM 1500 trucks use a unique bed rail design that requires specific clamp adapters included in RAM-specific kits. These adapters ensure proper clamp seating and load distribution across the RAM’s bed rail structure. Standard clamps without adapters can crack or damage RAM bed rails.
RAM’s RamBox option requires special rail positioning to clear the storage compartments while maintaining proper panel alignment. Measure carefully from RamBox edges to ensure adequate clearance for both cover operation and storage compartment access.
The RAM tailgate’s assist mechanism may require adjustment after installation due to changed weight distribution with the cover installed. Most RAMs handle the additional weight without modification, but some may need dampener adjustment for smooth operation.
Common Installation Mistakes and Solutions
Even experienced installers encounter challenges during bakflip mx4 installation. Understanding common mistakes helps you avoid problems and recognize when adjustments are needed. Most installation issues stem from rushing the alignment process or skipping measurement steps.
Rail Alignment Problems
Misaligned rails cause binding, uneven gaps, and premature wear throughout the system. The most common mistake involves installing rails without proper measurement, resulting in non-parallel alignment that prevents smooth panel operation. Always measure from multiple reference points before tightening clamps.
Rails positioned too far forward or rearward create clearance issues with tailgates or cab interference. Use the truck-specific positioning guides and measure twice before making final adjustments. Moving rails after panel installation requires complete disassembly.
Uneven rail height causes panels to sit at different levels when closed, compromising weather sealing and appearance. This usually results from inconsistent clamp tightening or debris under rails during installation. Clean mounting surfaces thoroughly and follow torque specifications exactly.
Panel Binding and Folding Issues
Panels that bind or resist folding indicate hinge misalignment during assembly. This often occurs when panels are forced into position rather than aligned properly before securing. Binding issues worsen over time and can crack panels or bend hinges.
Over-tightened hinge bolts restrict panel movement and accelerate wear. Follow torque specifications and test operation after each hinge installation. Panels should fold smoothly with minimal effort—resistance indicates adjustment needs.
Temperature-related binding occurs when metal expansion differences between panels and rails cause tight operation in hot weather. This typically indicates incorrect rail spacing that becomes apparent only under thermal stress. Allow the cover to cool before making adjustments.
Seal Installation Errors
Poor seal adhesion leads to weather sealing failures within the first few months of use. This usually results from inadequate surface preparation or installing seals in cold conditions. Clean surfaces with isopropyl alcohol and ensure temperatures above 50°F during installation.
Stretched or compressed seals during installation create uneven compression when panels close. Seals should install with slight slack to accommodate thermal expansion. Overstretched seals tear prematurely while compressed seals don’t seal properly.
Gaps at seal joints allow water intrusion at corner areas. Carefully measure seal lengths and cut with sharp tools for clean joints. Overlap joints slightly and use seal adhesive at connections for weatherproof performance.
Post-Installation Testing and Adjustments
Complete your bakflip mx4 installation with thorough testing to verify proper operation and identify any needed adjustments. Systematic testing catches problems before they become expensive repairs or safety hazards. Take time for complete evaluation—rushing this step negates careful installation work.
Operation Testing Procedures
Test all folding positions starting with single panel operation. Each panel should fold smoothly and consistently without binding or resistance. Open panels one at a time, checking hinge operation and panel alignment. Resistance or noise indicates adjustment needs.
Verify automatic latch engagement by closing panels gently. Latches should engage with audible clicks without forcing panels into position. Test latch security by attempting to lift closed panels—properly adjusted latches resist lifting without excessive force.
Check tailgate clearance throughout its entire opening range. The cover should not contact the tailgate in any position, including maximum opening angle. Contact points cause paint damage and can crack panels or bend tailgate hinges over time.
Weather Sealing Verification
Test weather sealing with water spray from a garden hose before exposing the installation to actual weather. Spray water over closed panels, paying attention to panel joints, perimeter seals, and corner areas. Water intrusion indicates seal problems requiring immediate attention.
Check seal compression by examining seal contact patterns when panels close. Properly installed seals show even compression across their entire length. Uneven contact indicates alignment problems or damaged seals requiring replacement.
Perform the water test again after driving for several hundred miles. Initial settling may affect seal compression and require minor adjustments. Most installations need no changes, but checking ensures long-term weather protection.
Final Adjustments and Fine-Tuning
Make final adjustments to latch tension and panel alignment after initial testing reveals any issues. Small adjustments improve operation and prevent future problems. Document any changes for future reference during maintenance or warranty service.
Verify that all hardware remains properly torqued after initial use. Vibration and thermal cycling can loosen connections, particularly during the first month of operation. Re-check clamp torques and hinge bolts according to your real truck bakflip mx4 installation documentation.
Clean the installation thoroughly, removing fingerprints, installation marks, and any debris accumulated during assembly. Apply appropriate protectants to maintain appearance and prevent premature aging of seals and finish.
Maintenance Schedule After Installation
Proper maintenance following your bakflip mx4 installation ensures years of reliable operation and maintains warranty coverage. Establish a regular maintenance routine during the first month while you’re familiar with the installation process. Early maintenance catches developing problems before they require expensive repairs.
First Month Break-In Period
Monitor your installation closely during the first 1000 miles of driving. New installations undergo settling that may affect alignment, seal compression, and latch operation. Check clamp torques weekly during this period—vibration can loosen connections before thread-locking compounds fully cure.
Test latch operation daily during break-in to ensure automatic engagement remains consistent. New latch springs may require minor tension adjustments as they settle into normal operation. Most installations need no changes, but checking prevents problems from developing.
Inspect seals for proper compression and adhesion after the first few rain exposures. New seals may shift slightly during initial weather cycling. Address any seal problems immediately to prevent water damage to cargo or truck bed components.
Regular Maintenance Procedures
Clean your MX4 monthly with mild soap and water to remove dirt and debris that accelerate wear. Pay special attention to hinge areas and drainage channels where accumulated debris causes binding and drainage problems. Use compressed air to clear blocked drain holes.
Lubricate hinges and latches quarterly with appropriate lubricants specified in your maintenance guide. Silicone spray works well for seals and moving parts exposed to weather. Avoid petroleum-based products that degrade rubber seals and attract dirt.
Inspect all components seasonally for wear, damage, or loosening. Look for cracked seals, loose hardware, or binding operation that indicates developing problems. Address minor issues promptly to prevent expensive component failures.
Troubleshooting Common Post-Installation Issues
Even perfect bakflip mx4 installation may develop operational issues over time due to settling, wear, or environmental factors. Understanding common problems and solutions helps you maintain optimal performance without professional service for minor adjustments.
Panel Alignment Drift
Panels that gradually move out of alignment typically indicate loose clamp connections or rail movement. This often develops during the first few months as connections settle. Check clamp torques and retighten according to specification—most alignment issues resolve with proper tightening.
Temperature cycling can cause differential expansion between aluminum panels and steel truck beds. This may require seasonal adjustments in extreme climates. Small alignment changes are normal—significant movement indicates installation problems requiring attention.
Cargo loading affects panel alignment over time, particularly with frequent heavy loads. Check alignment monthly if you regularly carry maximum payload. Overloading can bend bed rails and permanently affect cover alignment.
Weather Sealing Degradation
Gradual seal deterioration from UV exposure and ozone causes hardening and compression loss. Replace seals showing visible cracking, permanent compression, or hardness. Quality seals last 5-7 years with proper maintenance in most climates.
Water leaks developing at specific locations usually indicate localized seal failure rather than general degradation. These spot repairs often resolve with seal replacement at affected areas. Complete seal replacement may not be necessary if most sealing remains effective.
Seasonal leak patterns may indicate thermal expansion issues rather than seal problems. Leaks appearing only in extreme temperatures suggest adjustment needs rather than component replacement. Document leak patterns to help diagnose root causes.
Professional Installation vs DIY Considerations
While many truck owners successfully complete bakflip mx4 installation themselves, others benefit from professional installation depending on experience level, available tools, and time constraints. Understanding the complexity helps you make the right choice for your situation.
When to Choose Professional Installation
Consider professional installation if you lack mechanical experience or don’t own the necessary tools. The MX4 installation requires precision that inexperienced installers may struggle to achieve. Poor installation causes operational problems and may void warranty coverage.
Trucks with modifications or damage need professional assessment before installation. Modified bed rails, aftermarket accessories, or previous accident damage may require special procedures or additional parts. Professionals have experience handling these complications.
Time-constrained owners often find professional installation more convenient than spending entire weekends on DIY projects. Professional installers complete most installations in 60-90 minutes versus half-day DIY timeframes. The labor cost may justify the time savings and guaranteed results.
DIY Installation Benefits and Requirements
DIY installation saves $200-400 in labor costs while providing complete familiarity with your cover’s construction and operation. This knowledge helps with future maintenance and troubleshooting. You’ll understand exactly how everything fits and operates.
Successful DIY installation requires adequate tools, workspace, and patience. Rushing leads to mistakes that require professional correction at higher total cost. Budget adequate time and don’t attempt installation under time pressure or adverse weather conditions.
DIY installers must follow instructions precisely and understand when problems exceed their capabilities. Attempting repairs or modifications beyond your skill level can cause expensive damage that professional installation would have prevented.
Warranty Implications and Documentation
Proper bakflip mx4 installation documentation protects your warranty coverage and ensures you receive full manufacturer support if problems develop. BAK Industries honors warranty claims on properly installed covers but may deny coverage for installation-related issues.
Installation Documentation Requirements
Keep detailed photo documentation of your installation process showing proper procedures and final results. Photos proving correct installation help support warranty claims if questions arise about installation quality. Include images of clamp positioning, torque specifications, and final alignment.
Save all packaging, instructions, and parts receipts. BAK Industries may request this documentation during warranty evaluations. Original packaging includes important serial numbers and date codes that verify warranty coverage periods and manufacturing specifications.
Document any modifications or adjustments made during installation. Note truck-specific procedures, unusual conditions, or special tools used. This information helps service technicians understand your specific installation if warranty service becomes necessary.
Professional Installation Benefits for Warranty
Professional installation typically includes installation warranties covering labor and adjustment needs for the first year. This additional coverage complements manufacturer warranties and provides complete protection against installation-related problems.
Professional installers document their work and maintain relationships with BAK Industries for warranty support. Their experience handling warranty claims can expedite resolution if problems develop. They understand exactly what documentation BAK requires for claims processing.
Professional installation often qualifies for extended warranty options not available to DIY installers. Some dealers offer comprehensive coverage extending manufacturer warranties or providing additional benefits like free annual maintenance.
Frequently Asked Questions
How long does BAKFlip MX4 installation take?
Most bakflip mx4 installations take 60-90 minutes for experienced installers or 2-4 hours for first-time DIY installation. Time varies based on truck model, installer experience, and any complications encountered. Allow extra time for careful measurement and testing rather than rushing the process.
Can I install an MX4 without drilling holes in my truck?
Yes, the BAKFlip MX4 uses no-drill clamp installation that secures to existing bed rail structure without permanent modifications. The clamp system provides secure mounting while preserving your truck’s resale value. Most installations require no drilling, cutting, or permanent changes.
What tools are required for MX4 installation?
Basic hand tools including socket wrenches, screwdrivers, and measuring tape handle most installation requirements. A torque wrench ensures proper clamp tightening. Specific tool requirements vary by truck model—check your installation guide for truck-specific tool needs before starting.
Do I need help installing the MX4?
While one person can complete bakflip mx4 installation alone, having assistance makes the process faster and easier. Helpers assist with panel positioning, alignment checks, and holding components during assembly. Consider assistance if you have physical limitations or limited experience.
Will installation affect my truck’s warranty?
No-drill clamp installation typically doesn’t affect truck warranties since no permanent modifications are made. However, check with your dealer if concerned. The MX4’s clamp system doesn’t alter truck structure or electrical systems that could void manufacturer coverage.
Can I remove and reinstall the MX4 if needed?
Yes, the clamp installation allows complete removal and reinstallation for truck service or seasonal storage. Save all hardware and follow disassembly procedures in reverse order. Most owners never need removal, but the capability exists without damaging truck or cover.
What if my installation doesn’t fit properly?
Contact your dealer or BAK Industries customer service if fit problems occur during installation. Most issues stem from incorrect rail positioning or skipped measurement steps. Professional diagnosis determines whether installation correction or part replacement is needed to achieve proper fit.
How soon can I drive after installation?
You can drive immediately after completing bakflip mx4 installation and final testing. However, check clamp torques after the first 100 miles and again at 500 miles to ensure connections remain tight during initial settling. Most installations need no adjustments during this period.